Home-made seed trays

Here is a quick bit of information on the preparatory work on  the tins that hold the toilet roll tubes now that they are filled with compost and planted up with seeds.

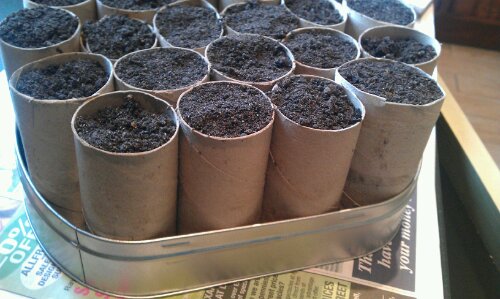
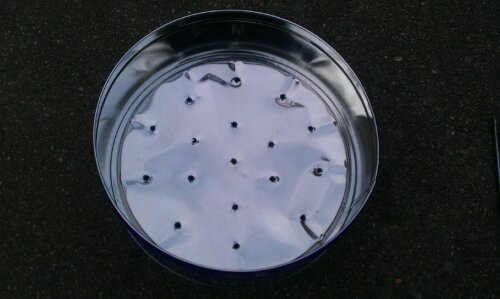
This example is nothing special just an old chocolate tin from Christmas time (in this case it’s Heroes) with some drainage holes added using a hammer and large nail.

image

It also seems a good idea to flatten down the edges of these holes as they looked pretty sharp but a gentle bash with the hammer did the trick.

After that it was a simple task to fill the toilet roll tubes with some sieved compost (John Innes No 1 seemed the best option), plant the desired seeds (leeks and carrots) and then water them gently.

At first I hadn’t quite factored in the water absorption properties of the cardboard tubes which meant the first watering wet the tubes as well as the compost. However it was easily dealt with by giving them a second quick watering a short while later.

image

Fingers crossed for the future but so far my plans seem to be working…

The first batch of leeks and carrots are in!

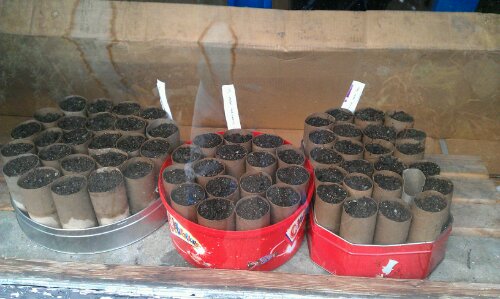
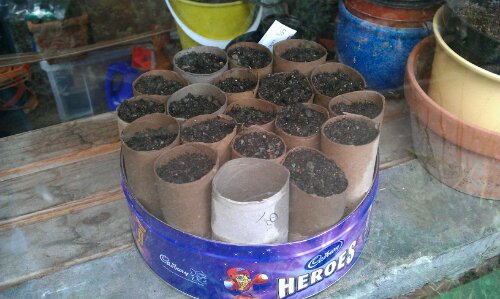
Just to prove that the toilet roll tubes worked well, here are a couple of pictures showing last weekends seed sowing. I have to confess that carrots weren’t originally on my list to grow but then I read somewhere about planting quick-growing crops in with the slower growing ones.

As a result I have batches of leeks (Apollo F1)  and carrots (Nantes Early?) planted and already on the garage windowsill. The  toilet roll tubes look like they are working well so far too which is nice!

Seeds in toilet roll tubes and biscuit tin


In total I have about 80 toilet roll tubes which I filled using  a 20 litre bag of John Innes No 1 and that is about evenly split with 40 of leeks and 40 of carrots.

A range of seeds planted and labelled


The weekend beckons and the garden is calling…

I have big plans for activity on the vegetable growing this weekend so there should be much progress to report next week. For the moment I have posted a page of advice on growing potatoes which contains most of the knowledge I have gathered from various websites, blogs and vegetable growing books.

This  will be updated with any additional potato advice that I find and also with further details of my own experiences with growing Charlotte potatoes in a new vegetable bed I’ve started using.

With luck I should be able to plant a lot of my leek seeds in my home-made seed trays using cardboard tubes from toilet rolls. I may even experiment a little bit by filling them with different types of compost.

I also hope to fix my wheelbarrow which has had a flat tyre for ages and my initial attempts at repairs last year using a new inner tube were less than successful. I may end up cutting my losses though and just buy a new one – I can always place  the old barrow at the end of the garden and use it as a new raised bed


Setting up new vegetable beds

I thought it would be a good idea to keep some notes on the problems I had when first setting up the new raised vegetable beds. In general the process went fairly smoothly but there were a number of things that on reflection I might have done differently!
image

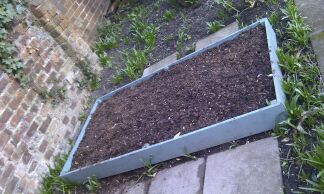
As you can see these are just average “low-slung” raised beds (these to be precise) that I ordered from Greenfingers.com once I’d decided to expand the amount of veg growing space in the garden.

Construction

The various parts of the flat pack kits were all painted with using the leftover bits from an old tin of wood preserving paint – maybe not the ideal solution for a more permanent setup but in my mind I’m still at the “evaluation stage” so I’ll give things a try while learning lessons along the way.

The first thing I noticed during the assembly was that the wood occasionally split when screwing the sides to the uprights.  The wood is perfectly adequate quality for a raised veg bed and should last several years (maybe up to 5 perhaps?)  but it would presumably last a lot longer if the construction didn’t leave splits and cracks everywhere.

Best lesson learned:  Build them properly so it lasts longer!

Installing and Filling

imageAs I’d found no better information while researching on the web, I order in a load of compost and manure to fill up my newly created veg beds. This combination was mixed  (with a bit of digging) into  the original top soil plus some extra spare top soil I had elsewhere. I also added what little existing home-made compost I already had so I’m hoping that the mixture will prove productive in the end.

After regularly reading the same point being made by a number of different books I decided to place a cloche over the veg bed which will be getting the potatoes later. This was partly to help keep the frosts off the newly dug area and partly to  encourage any remaining weeds to show themselves so I can get rid of them before planting.

Best lesson learned:  Use covers  in late winter so  weeds start growing and  you can get rid of them early!

Planting and results

Once the first veg bed was in place late last autumn I gave in to the impatience and temptation to plant something by nipping off to B&Q to buy some cabbage seedlings. I planted them out with great expectation for the future and they were immediately set upon by something which nibbled leaves relentlessly – presumably caterpillars although I never found any.  Some netting has since been added but even by February the plants were less than impressive so I’ll just have to give them time.
 

Planting the leek seeds

These are not mine obviously!

The leek seeds (Apollo) arrived from Marshalls Seeds as part of the initial delivery in January along with the seed potatoes and some Growmore so I’ve been impatient to get them planted ever since.

Unfortunately as I don’t have a proper greenhouse and the weather up here in the North East of England can be slow to warm up, I plan to use the garage windowsills  so I don’t want to start too early. Luckily this is also delayed by the fact that work keeps me busy and away from the garden so I can’t get to these until next weekend I think.

Staggered Planting

Another favourite subject of mine this year is staggering the planting time so I’ll be doing the leek seeds in two batches spaced at least 3-4 weeks apart. It may not make much difference with  leeks in the long run as they  stay in the ground for quite some time but at least it spreads out the enjoyment of planting the seeds!

Seeds in a roll

I’m not sure where I got the original idea from but after deciding to expand the veg beds late last year, I thought  it would be a good idea to save the cardboard tubes from the middle of the toilet rolls for use in the garden.

I’m amazed how many I managed to save between December and February but there are absolutely loads even though as far as I can recall we didn’t have an outbreak of dysentery in the period.

How will it work?

My theory was two-fold and goes something like this:

  1. I can fill the cardboard tubes with seed compost and stack them all together in an old chocolate tin left over from Christmas with drainage holes. They can start off indoors like this and just  plant them out in the tubes  at the right time to minimise root disturbance – the  tube will eventually rot away.
  2. I can also use the cardboard tubes as an aid when “blanching the leeks as they develop. I thought, why not just slip another roll (or half roll) over each growing plant so that I can  build up the earth around the plant with less risk of getting soil in amongst the leaves.

However after reading about an experience of  mould appearing on cardboard/paper based seed starters I’m starting to have small doubts. Presumably this can be prevented with good drainage and proper ventilation but I’ll be keeping my eyes out for this in the future.

Getting started or just prevaricating again?

So what should be the first thing you think of doing once you get the idea for growing vegetables and pursuing a vaguely greener lifestyle?

Obviously there is all the planning to be done, preparation of vegetable plots, ordering of seeds, composting, digging/weeding and such like. Not forgetting the multitude of choices available which complicate the decision for what to grow and when to get start planting!

It all seems a little daunting at first so why not take the easy option… start a blog instead! It keeps you warm on a cold winters evening when you can’t get out to the garden (or can’t be bothered) and also focuses the mind on the various issues.

We live in the north east of England in a fairly normal suburban semi-detached house with a garden and neighbours on both sides. Over the years I have dabbled with growing vegetables occasionally with varying results. I can recall a fair success with potatoes a number of years back but if I’m brutally honest last years spinach was a bit of waste of time.

Most of my attempts have generally grown fairly well but eventually things suffer  because “real life” gets in the way to stop plants getting watered or weeded. Notice how it’s the plants fault and not mine?

This time though the outcome  will be completely different – for one thing I’ve got a blog to maintain as well so my  theory is  that I have to keep up the garden work otherwise there will be nothing to write about on the blog! I’m sure my logic is sound…