Building new vegetable beds

It didn’t take long after moving in for us to realise that having such a large expanse of lawn would be far too time-consuming every week even with the industrial grade petrol mower we bought. We could have just bought a ride-on mower and tackled the problem in that way but I preferred an alternate approach particularly as we had no need for so much lawn.

My approach was that if the grass takes too long to cut and we don’t use that area anyway then it makes sense to use that space for extra vegetable growing space. This is especially relevant as I had very quickly filled up the existing vegetable bed soon after we moved here!

General plan

After considering some different layouts and even briefly considering the idea of a parterre with fancy box hedging, I soon realised that this would involve almost as much work as the lawn which defeated some of the object! In the end I decided to be more practical and common sense prevailed – the final layout I devised was this:


Final veg bed layout

Materials so far

Some lengths of 6″ x 2″ timber from the local timber merchants

Some 2 ft long, 2″ x 2″ corner posts to hold the beds together.

Unwanted cardboard boxes left over from the move

A few “dumpy” bags of compost (but I won’t recommend buy that again due to the poor quality)

Progress so far

This was never going to be a rush project as I only expected to use these for the first time next spring. However by the time I had some of them in place and filled with compost/soil it seemed a shame to waste the growing space.

The initial layout was an exercise in careful measuring and placing stakes. A layer of cardboard covered with grass cuttings and compost hopefully kills off the existing growth and acts as a good mulch base. This allowed me to visualise some of the layout before cutting any boards to length incase I decided the sizes weren’t working for me.

Step 1 - Cardboard, grass cuttings and compost
Step 1 – Cardboard, grass cuttings and compost

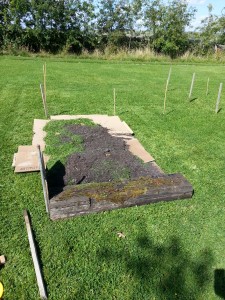
At first this didn’t look too promising to my untrained eye but after adding the boards around the edges including some old sleepers from elsewhere in the garden the first few came together quite nicely.
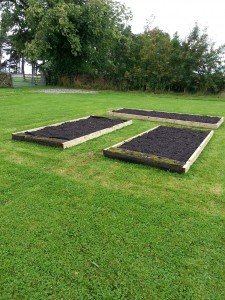
Step 2 - Edge boards and top soil
Step 2 – Edge boards and top soil

A Work In Progress

There are now 4 of the 7 raised beds in place and I couldn’t resist the temptation to plant something.

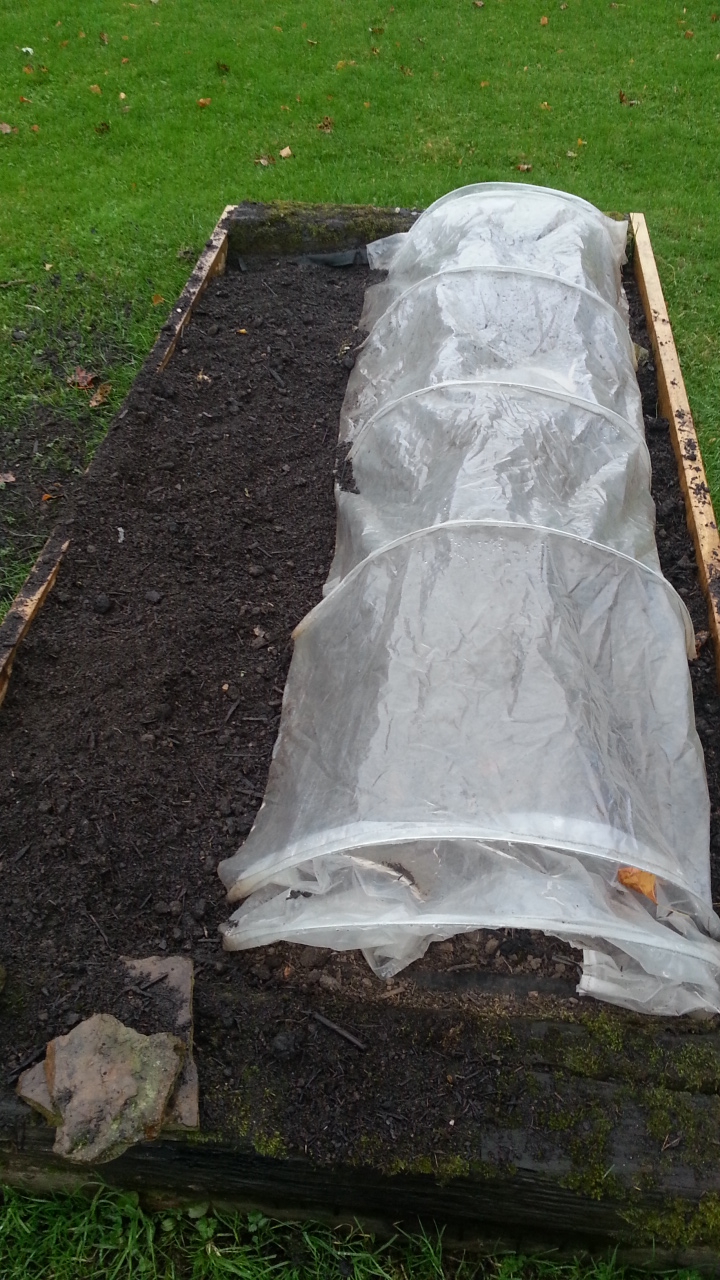
I’ve not used green manure before so I planted two beds with different varieties to try that out. Also a late sowing of carrots, onions and beetroot seemed like a good idea at the time but the weather has since become a lot more autumnal so I don’t expect much from that.

While waiting to see what if anything will germinate, I covered half of that bed with a clear plastic tunnel and the other half with some bubble wrap. It would have been interesting to see if there was a difference in the results between the two materials.

Unfortunately after I removed the covering temporarily on a day when the weather had picked up a bit, the chickens discovered the joys of scratching and dust bathing in the loose soil when I wasn’t looking.

I don’t expect much to survive now other than the few rows which I covered over again with the plastic cloche but you never know! The green manure may never recover but I can always try that next year.

Partially protected carrots, onions, beetroot

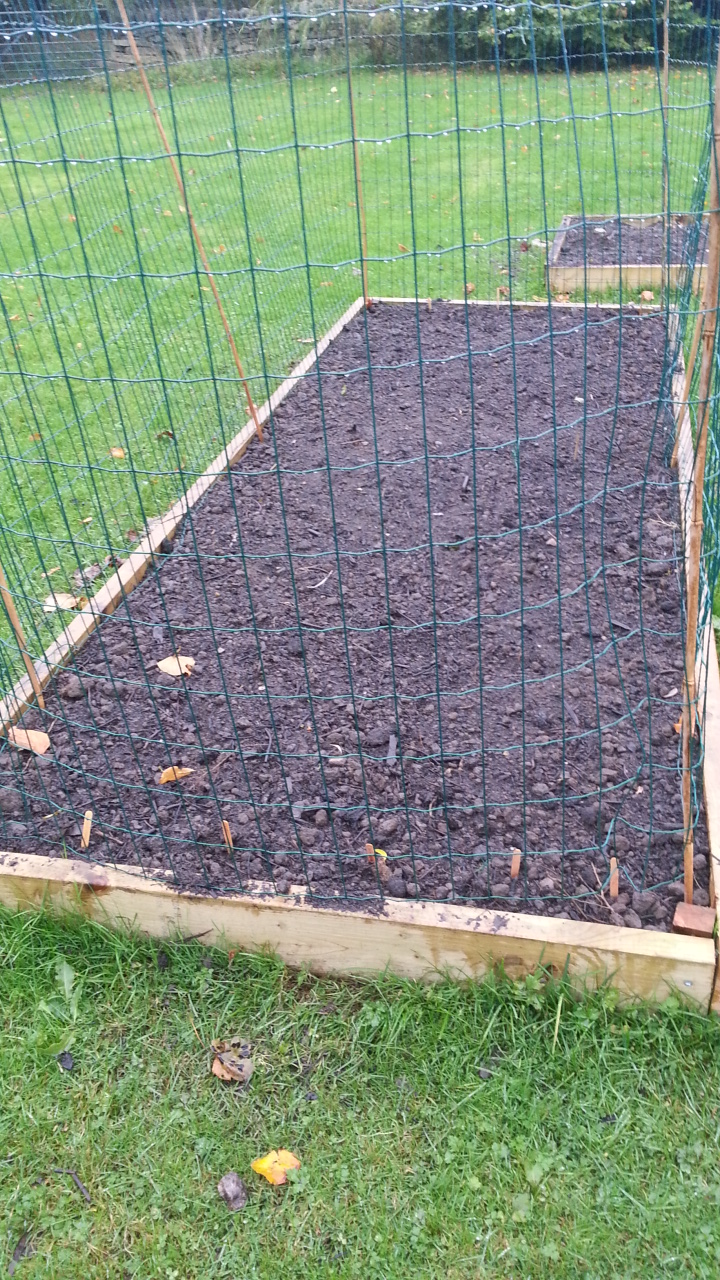
Luckily I learnt my lesson from this episode and the next batch of sowing – garlic and overwintering onion sets – were planted last weekend behind a temporary 4 ft high fence

Garlic and onion behind a security fence

Some hard lessons learned but once I get the rest of the raised beds finished with luck all this effort will pay off in the spring when I can get much more in the ground that I did this year!

Time flies, carrot flies and cabbage white butterflies

The recent period of rain has been very welcome and luckily we’ve not had quite as much here in the North Pennines as some other areas of the UK. The time is flying past and given all these excellent growing conditions I knew it was probably time for another general vegetable update

Watching  the rainwater running out of the gutters and disappearing down the drains makes me want to add more water butts in a few places. On the other hand, I think we can probably expect  to have higher average rainfall here than at our old house near the coast so perhaps we won’t need them quite as much? Time will tell …

Existing raised beds

Existing raised beds

The existing raised beds with a few onions, carrots and beetroot are still going well. These were all planted at the start of June within a day or two of moving in.

We have already harvested a few small “baby” beetroots which tasted very nice with a not unpleasant “earthy” undertone (even though we washed/cooked them).

Another couple of short rows of beetroot have now been planted in the empty space which is just visible at the back.

These are already starting to show signs of growth so I’m definitely a convert to the idea of soaking beetroot seeds overnight before planting them.

The few carrots here are only just at the “baby” stage now and although a few have been sampled I hope to leave them in place a little longer. It would be good to get our first full sized carrot from the garden and in the meantime another short row of carrot seeds has been planted elsewhere for the future.

Around these carrots I sowed some onion seed in the hope that this would discourage carrot fly – not that I’ve seen any evidence of this. Perhaps the raised beds in a separate raised area have fooled the carrot flies because I think they don’t fly very high off the ground.

This is my first time growing onions from seed and they are doing remarkably well. I tried onion sets last year but I felt that was not quite as much fun – I prefer planting seeds instead of a smaller version of the finished article because seeds give a greater sense of achievement at harvest time.

It will obviously be a little while yet before we can consider trying these onions but they are developing well.  There are a few more onion seeds left so I think they will be planted towards the end of August to try overwintering them (if I can find the space).

The long veg bed

This is mostly devoted to cabbages and leeks – not because we’re big fans of those but because I bought too many seedlings for each and can’t bear to throw any of them away.

Cabbages and leeks
Cabbages and leeks

As usual a combination of eagerness to plant leeks and underestimating the size of cabbages has meant that some leeks are now being swamped by the expanding cabbages. I’m hoping that the leeks planted between the cabbages will put on enough growth that they can be used first before they get totally overwhelmed.

The handful of pea seeds which came up are at the back and doing their best to climb up their supports. There are even a few flowers starting to form so I may get a small saucer of peas this year if I’m lucky!

This weekend will probably involve some detailed examination of the cabbage plants.  I’ve seen a few cabbage white butterflies around the garden so it must be time to take action.

The “Old House” rhubarb

The two pots of rhubarb which were planted into pots at the old house before we moved are doing really well again. There was a period of a few weeks recently when they appeared to stop growing despite good weather, careful attention, watering and such like.

Eventually I came to the conclusion that the plants just needed more nutrition having exhausted the supply in the pots. A quick sprinkle of some Growmore plus a little extra compost to mix it in with and they soon burst into life again.

Rhubarb in pots
Rhubarb in pots

I’m not sure if I’m imaging things but I think this photo shows  the difference in leaf shapes quite nicely with the Stockbridge Arrow in the foreground having a more pronounce “arrow” shape to the leaves.

Seedling progress

Although it might be a little late, I recently planted some parsnip seeds on the basis that we really like parsnip. Hopefully they’ll develop well but not too quickly as I will need to find some space to plant them out once something else has been harvested

Parsnip seedlings
Parsnip seedlings

The free packet of Dwarf bean seeds have also been planted but I used some large troughs which we had brought with us. Perhaps not the best situation for them but I ran out of space very quickly and still wanted to give them a try this year. I can’t resist a freebie although I’m not sure that I’ll eat many of them – we’ll see how they develop.

Dwarf beans in troughs

Future plans

There is a common thread running through this post about a lack of growing space so it may not be long before some of the extensive and under-utilised lawn is replaced with raised beds. This is especially relevant through the spring and summer as I’d rather spend my time growing produce than cutting the grass every week.

Some sturdy rabbit defences will be needed as they seem to be getting bolder each week but I’m hoping that razor wire, sentry towers and armed guards will not be needed.

Perhaps there is even space for a small orchard if the sheltered location I have in mind will counteract our altitude here (1000ft above sea level). If I’m lucky there will be enough shelter from trees and low stone walls to give some fruit trees a chance?

The end of year garden clean up

The weather has been kind around the end of December and so we managed a good couple of days work in the garden to end the year – to my untrained eyes at least it makes quite a noticeable difference. After all the wet weather and the lack of any decent chance recently for things to dry out I wasn’t sure when we started that anything constructive could be done though.

Luckily a little bit of weed control fabric and some strategically placed cloches seem to help bring things together on the veg beds at least. We are already starting to see some shoots coming through which I guess must be the snowdrops so I need to keep the chickens off those flower beds if I want to see them grow!

Raised veg bed with plastic cloche

Now that the leeks are all harvested and eaten all 3 veg beds are now tucked up for a couple of months while I try to decide what to do next year.

Raised veg bed with weed control fabric

And chickens really enjoy it when you dig over the compost heap, in this case I was redistributing the contents of the current compost heap and adding a little of the contents from an older heap to liven things up. I can’t help thinking that the chickens will have cleaned out any worms that I managed to transfer though so maybe the effort was wasted.

Chickens love a good compost heap

What to try in 2013?

We are still hoping to sell the house in the early part of this year so there aren’t any major plans for the veg beds but I can’t just leave them empty. Maybe a quick peek in the seed catalogues and some fancy planning with a calendar will throw up some ideas for vegetables that are happy with early planting and give a quick harvest? Of course there are always a few pots of various sizes dotted around which I could plant up and then if necessary take with us when we move so maybe all is not lost!

I’d better get off to study the catalogues and vegetable books but any suggestions or past experiences would be most appreciated…

Planting update

First early potatoes planted and under a clocheWhat a busy bank holiday weekend that turned out to be. Thankfully the weather was kind and I was able to finish just about everything on my list. It’s good to see the new raised veg beds getting some use finally and all the effort getting to this point seems worth it at the moment.

The potatoes are now in the ground – there are only two fairly short rows but I have limited space for the moment so I am only able to put in a little bit of everything.

I’ve left a cloche over them for the moment as the weather forecast for the coming week seemed to be predicting some pretty cold nights. As we are near the coast any colder nights may not be a huge problem but I’d rather be safe than sorry.

Trust me though, there are definitely two rows of potatoes under that plastic in the picture and hopefully I have planted them far enough apart unless my measuring went wrong!

Carrot seedlings planted up and under a clocheThe carrots have also been planted out now and they were kept in the toilet roll tubes which made planting a really simple task. I have also recently come across this old page on the web which claims that this approach helps to prevent pest problems too!

They might have been just a little too small to plant out but I figured that as they should really have been planted directly into the veg beds in the first place then this won’t matter too much.  By using the toilet roll tubes and leaving a cloche over them I think I’ve covered my bases fairly well.

Unfortunately the leek seedlings are just not quite ready for planting out as they are still only about 3 inches high and pretty thin, I would say weedy but that’s unfair to my leeks.

Garlic making good progressHowever this minor delay is probably not a bad thing because the weather has still not warmed up properly here in the North East of England.

It doesn’t seem to be affecting my garlic though because that is making great progress. I planted 3 cloves in this small terracotta trough (as well as in other locations) and they are already coming up strongly.

The bluebells in this picture look good as well!


Update on the raised beds

Raised veg bed with cabbages

Here are a couple of quick pictures as an update on the raised beds I added over the winter. To my inexperienced eye they look pretty impressive but then what do I know! 🙂
Last autumn I planted a few cabbage seedlings out (an impulse buy at B&Q) but they haven’t done a lot so far… At least the wood chip path along one side is looking nice and the bluebells which are everywhere should add a nice bit of colour eventually.

The other raised bed just next door is also looking good and when I took this picture the plan was to keep it covered for a while to keep it protected from any cold weather. I soon realised that the forecast is looking good for this week so I might as well leave it uncovered and get some rain on it!

Covered raised veg bed

Setting up new vegetable beds

I thought it would be a good idea to keep some notes on the problems I had when first setting up the new raised vegetable beds. In general the process went fairly smoothly but there were a number of things that on reflection I might have done differently!

image

As you can see these are just average “low-slung” raised beds (these to be precise) that I ordered from Greenfingers.com once I’d decided to expand the amount of veg growing space in the garden.

Construction

The various parts of the flat pack kits were all painted with using the leftover bits from an old tin of wood preserving paint – maybe not the ideal solution for a more permanent setup but in my mind I’m still at the “evaluation stage” so I’ll give things a try while learning lessons along the way.

The first thing I noticed during the assembly was that the wood occasionally split when screwing the sides to the uprights.  The wood is perfectly adequate quality for a raised veg bed and should last several years (maybe up to 5 perhaps?)  but it would presumably last a lot longer if the construction didn’t leave splits and cracks everywhere.

Best lesson learned:  Build them properly so it lasts longer!

Installing and Filling

imageAs I’d found no better information while researching on the web, I order in a load of compost and manure to fill up my newly created veg beds. This combination was mixed  (with a bit of digging) into  the original top soil plus some extra spare top soil I had elsewhere. I also added what little existing home-made compost I already had so I’m hoping that the mixture will prove productive in the end.

After regularly reading the same point being made by a number of different books I decided to place a cloche over the veg bed which will be getting the potatoes later. This was partly to help keep the frosts off the newly dug area and partly to  encourage any remaining weeds to show themselves so I can get rid of them before planting.

Best lesson learned:  Use covers  in late winter so  weeds start growing and  you can get rid of them early!

Planting and results

Once the first veg bed was in place late last autumn I gave in to the impatience and temptation to plant something by nipping off to B&Q to buy some cabbage seedlings. I planted them out with great expectation for the future and they were immediately set upon by something which nibbled leaves relentlessly – presumably caterpillars although I never found any.  Some netting has since been added but even by February the plants were less than impressive so I’ll just have to give them time.